JavaScript30 - Day 26

| Comments

Day 26 of #javascript30 is making a dropdown menu that follows you along.

This lesson takes what I learned on day 22 about getBoundingClientRect() and uses it to move around a box behind the contents in a dropdown menu. We use mouseenter and mouseleave to react to the items hovered over.

Using opacity for "animation"

I learned a really cool trick from this lesson. To get a cool "animated" feel, first add a class that displays block on the hovered item, and then a setTimeout() with about 150 ms delay that adds another class that sets opacity to 1. The item should have a transition set in CSS too to make it really look good.

A gotcha when using this approach is that on mouseleave, when you remove classes that keeps a list item open — you might get there "early" because of the timeout in the mouseenter function. So in the mouseenter function, you can simply check if the other classes that don't use the timeout are present before adding it.
JavaScript30 - Day 25

| Comments

Day 25 of #javascript30 explains what happens when (DOM) events are triggered.

I made a pen based on the lesson to try to illustrate and understand better. It's at the bottom of this post.

Bubbling

Is when an event "bubbles" up the DOM. In the example with 3 nested divs with an event listener on all of them, a click on the inner one will trigger the click listener on all of them. Note that this is the item the listener is on, but event.target is always the item that was clicked.

Propagation

In JS this means that the event will keep bubbling up (or capturing). If you call e.stopPropagation() the propagation stops.

Event listener parameters

The addEventListener() function takes an optional options object. Of these, capture and once are interesting.

once

Will allow the event to fire once and then remove the event listener.

capture

I think the easiest way for me to understand this is that when this is true, the events bubble backwards. Try playing around with the pen example to try and make sense of it :)

See the Pen Event options and propagation by Camilla Krag Jensen (@naxoc) on CodePen.


JavaScript30 - Day 24

| Comments

Day 24 of #javascript30 is making a navigation bar that sticks to the top of the window.

This is something I have done more than once before. With some frustration, though. The same effect can be achieved with CSS's position: fixed, but you still need JS to slap on the class or property at the right time.

scrollX and scrollY

Keep in mind that that IE does not supprt these two at all. Edge does, but to be safe, use pageYOffset or pageXOffset - these are aliases for scrollX and scrollY. See the docs for scrollY for an explanation.


JavaScript30 - Day 23

| Comments

Day 23 of #javascript30 is having fun with speech synthesis and new tricks for passing arguments to a callback function.

Speech synthesis in the browser

I could not make the lesson example work with the voices dropdown in Firefox. I like Firefox and I have recently switched back to using it as my default browser. I switch back and forth at least a couple of times every year. I even blog about it sometimes. Anyway. To make it work in Firefox (and Chrome), I did this:

function populateVoices() {
  voices = speechSynthesis.getVoices();
  voicesDropdown.innerHTML = voices
    .map(voice => `<option value="${voice.name}">${voice.name} (${voice.lang})</option>`)
    .join('');
}
if (speechSynthesis.onvoiceschanged !== undefined) {
  speechSynthesis.onvoiceschanged = populateVoices;
}

instead of using an event listener like this:

speechSynthesis.addEventListener('voiceschanged', populateVoices);

I kinda stole it from the MDN docs for SpeechSynthesis.

Passing arguments to a callback function

I also learned some new tricks when it comes to passing arguments to a callback function in JavaScript. I made a pen with them:

See the Pen Passing arguments to a callback function by Camilla Krag Jensen (@naxoc) on CodePen.

Not only will the first one not work. It will set the text "I should be an animal" to "nope" when then page loads. Try commenting out the last line where I set textDiv.textContent. I guess you can say it works once - just not the way you want it to :)


JavaScript30 - Day 22

| Comments

Day 22 of #javascript30 makes a link hover highlight that follows you around on the page. I try to understand the difference between mouseover and mouseenter.

mouseenter vs mouseover

Using transition and translate in CSS we can make the hover look like it is following you. We listen for the mouseenter event and then the highlight is moved with CSS' translate. I didn't know the mouseenter event, so I tried to read up on the difference between that and mouseover. The docs are really not crystal clear, so I must say that I didn't get all that much wiser from that. I found this demo on JSFiddle:

That helps a little, but I think the choice between the events depends a lot on the DOM you are working with. So maybe test with both and see which one gives you the most relevant amount of events. No reason to slam the browser because you are not using the optimal event.

Element.getBoundingClientRect()

Here is a method I would have like to have known about in the past. I've found myself working with position and size a lot and never really knowing which properties to use. getBoundingClientRect() gives you a DOMRect object that has height, width, top, and left. There are a couple of other properties, but be careful because not all of them are available in all browsers.


JavaScript30 - Day 21

| Comments

Day 21 of #javascript30 is making a compass and speedometer for the phone.

Using the iOS simulator on the mac for development I made a compass and speedometer.

Launching iOS Simulator

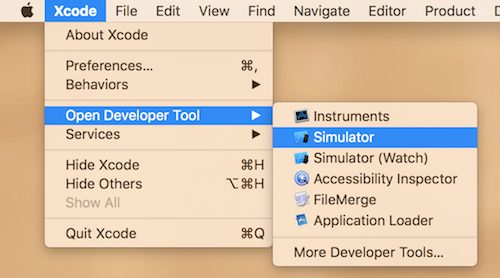
The simulator is built into Xcode which I never use. I do like the simulator for testing though, so I thought I'd post a tip on how to launch it without seeing Xcode:

  • One last time — launch Xcode and use the menu item Xcode -> Open Developer Tool -> Simulator Open iOS simulator from Xcode
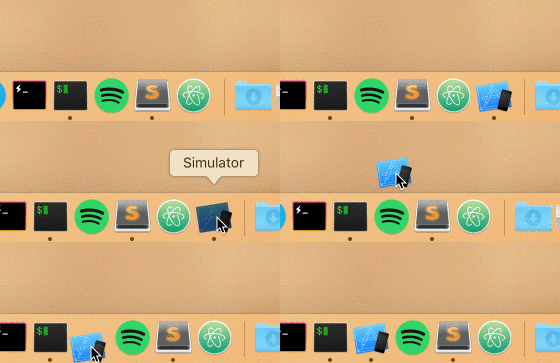
  • Drag the icon from the "open apps" area to the dock somewhere. iOS simulator attach to Dock

Next time you need the simulator, you can just launch it from the Dock instead of opening Xcode to open it.

Geolocation in the browser

There is a Navigator.geolocation property that has a watchPosition() method. The first parameter is a success callback and the (optional) second parameter is an error callback. There is a third one for options.

Putting it all together is as easy as this:

const arrow = document.querySelector('.arrow');
const speed = document.querySelector('.speed-value');

navigator.geolocation.watchPosition((data) => {
  arrow.style.transform =`rotate(${data.coords.heading}deg)`;
  speed.textContent = data.coords.speed;
}, (err) => {
  alert('Allow location or no worky');
});

where arrow is a round object that can be rotated and speed is just text. It will update when you move around. If you are not moving around while developing you are a lot like me, so in Simulator — go to Debug -> Location and choose "City Bicycle Ride" for instance to simulate a you moving around. You can open Safari and use the Web Inspector to inspect the simulated iOS by choosing Develop -> Simulator from Safari's menu.


JavaScript30 - Day 20

| Comments

Day 20 of #javascript30 is about speech recognition in the browser. It is safe to say I had a ton of fun and that I got completely carried away.

SpeechRecognition

The browser's interface for speech recognition is pretty easy to work with. I'm amazed at how good it is at guessing what you say. Granted - it will completely mishear from time to time, but so do I sometimes!

Speech recognition language

As always when working with web stuff, my initial reaction to the speech recognition was: oh, that's cool, I bet it only works in English and in the US just like recipes, address forms and all that. But more and more - I am proven wrong on the web. It made me happy that I can set the language to Danish even though only about 5 million people speak it. Here is how you set the language:

const recognition = new SpeechRecognition();
// Set the language.
recognition.lang = 'da-DK ';

Simply set the lang property to a new language code. The language code is an ISO language code. A list of language codes can be found here.

Listening for results

You listen for speech input with the result event. The event variable will have a ton of info, but you can pull the string out like this by making the result an array and running map on it a couple of times:

recognition.addEventListener('result', e => {
    const transcript = Array.from(e.results)
        .map(result => result[0])
        .map(result => result.transcript)
        .join('');
    // Update stuff with the transcript string.
    if (e.results[0].isFinal) {
            // The user paused.
    }
});

Putting it all together.

For now speech recognition only works in Chrome. I made a page that can use voice commands to change background color. Go check it out! Make sure you use Chrome for this. It doesn't work in Firefox.

It supports Danish, Spanish, and English. It was so much fun to play around with. I really feel like my taking the time to do #javascript30 is starting to come back. I feel so much more confident and I write nicer code much faster now.


JavaScript30 - Day 19

| Comments

Day 19 of #javascript30 is messing around with the webcam for a photo booth and doing cool effects by manipulating the RGB channels.

Webcam with JavaScript

Is so easy! You call getUserMedia() on the mediaDevices singleton to get a promise. Like this for instance:

const video = document.querySelector('.player');
navigator.mediaDevices.getUserMedia({ video: true, audio: false })
  .then(localMediaStream => {
    console.log(localMediaStream);
    video.src = window.URL.createObjectURL(localMediaStream);
    video.play();
  })
  .catch(err => {
    console.error('Ut oh', err);
  });

I had no idea that image manipulation was as simple as it is. There are 3 color channels in an RGB[A] image plus an alpha channel. I'm probably using the wrong words for these things, because I know very little about it. But go look at Pixel manipulation with canvas if you want to know more about how to change colors and make cool effects on images with JavaScript.

toDataURL()

Calling toDataURL() on a canvas element will give you the canvas content as a data url that you can either display or let the user download (or both!). Use the download attribute on the <a> tag to allow download.

const data = canvas.toDataURL('image/jpeg');
const link = document.createElement('a');
link.href = data;
link.setAttribute('download', 'smiling-face');
// Use the data for the image.
link.innerHTML = `<img src="${data}" alt="Smiling face" />`;

This was so cool. Interacting with an amazing piece of software like the browser is is so much fun. It's amazing what you can do with so little code! I really liked the CSS from the assignment that made my little webcam snaps look like polaroids:

Photo bootd


JavaScript30 - Day 18

| Comments

Day 18 of #javascript30 is about adding up playing times for videos using reduce(), some math, and a data attribute.

More compact code

I tend to prefer readable code over terse code, but I think I am starting to really like the one- or two-liners you can make with JavaScript. This assignment could be solved with just reduce() and some math after the reduce(). Here is code that goes trough all items with a time data attribute and adds up the seconds:

const lis = Array.from(document.querySelectorAll('[data-time]'));
const totalSeconds = lis.reduce((total, li) => {
  const [minutes, seconds] = li.dataset.time.split(':').map(i => parseInt(i, 10));
  return total + (minutes * 60) + seconds;
}, 0);

That is actually pretty neat I think. Much better than a bunch of loops like I would have done it in the past. An interesting side effect from doing all this thorough learning of JavaScript is that I get "inspiration" that I use in PHP everyday now. I have started using filter(), map(), reduce(), and sort() more in PHP and it makes for better code there too.

"Casting" with parseInt() and parseFloat()

In JavaScript the string concatenation operator is '+'. So it's not easy for JS to know what you want if you say this for instance:

console.log(23 + '01');

Do you mean "2301" or "24"? JS will assume the first, so you have to "cast" your variable to something that is a number. You might have noticed in the code snippet above that I pass a second argument to parseInt(). This is because if you have numbers that start with a '0', then parseInt assumes that it is either octal or decimal (this depends on the browser) if you don't specify the 'radix'. A radix is the mathematical numeral system eg. '10' like our ten-based. This is a perfect source of errors, so always pass the second parameter to parseInt.

I could have used parseFloat() that does not take the radix argument but this is a good gotcha and I like being precise.


JavaScript30 - Day 17

| Comments

Day 17 of #javascript30 is simply sorting an array of band names, but without considering articles like 'the', 'a' or 'an'.

I felt good about this one. I am starting to feel quite at home with JavaScript's array functions. I solved it without watching the video first and with very little code:

const bands = [
    'Another Band Name', 
    'An Amalgam', 
    'The Frosty Shred', 
    'Buffalo Of Arrow', 
    'The Thrash Paranoia', 
    'During Temperature', 
    'A During Temperature', 
    'The Drug Meeting'
    ];
const regex = new RegExp(/^(The|An|A)\ /, 'i');
bands.sort((a, b) => a.replace(regex, '') > b.replace(regex, '') ? 1 : -1);
document.querySelector('#bands').innerHTML = bands.map(band => `<li>${band}</li>`).join('');

Because sort() mutates the array, I needed very few lines of codes. I have linked to it before, but here is a list of array functions that mutate the array. It is important to understand, and nifty to know!