Atom editor update problem

| Comments

I have been playing around with Github's new editor Atom for a while now. I actually quite like it, but it still hasn't taken Vim's place as my default editor yet. Maybe it will at some point, but we'll see.

Atom updates itself and that has been working great, only it stopped working a while ago. It threw some long error to the GUI editor that I can't remember and when I tried to run apm upgrade it said:

➜  ~  apm upgrade
Package Updates Available (0)
└── (empty)

-- even though in the UI it said it had an update ready.

I poked around a for a while until I found a couple of mentions in the support forums like this one saying that you should just set file permissions on your ~/.atom/.node-gyp folder. So I did

chmod -R 777 ~/.atom/.node-gyp

and restarted the GUI Atom.app. Now my update was applied and everybody was happy again!


Switch between PHP versions with Homebrew

| Comments

I am working on a few older Drupal sites that are quite insistent on using PHP 5.3 and not PHP 5.4. No problem - I'll just use Homebrew to switch between versions! But I have been running into all kinds of problems every time I have done this, so I figured I would post what I do to repair things here.

So, in theory all you should have to do is install the versions you need if you don't already have them. brew install php53 And when you want to switch just run this: brew unlink php54 && brew link php53

Apache also needs to know what version to use, so edit /private/etc/apache2/httpd.conf so that the line that looks like this has the right (major) version number: LoadModule php5_module /usr/local/opt/php54/libexec/apache2/libphp5.so

So far so good. You can check the version from the command line:

➜  ~  php --version
PHP 5.3.28 (cli) (built: May  7 2014 09:50:08)
Copyright (c) 1997-2013 The PHP Group
Zend Engine v2.3.0, Copyright (c) 1998-2013 Zend Technologies
    with Xdebug v2.2.5, Copyright (c) 2002-2014, by Derick Rethans

If you are not seeing what you expect, try adding add this to your .bashrc or .zshrc with the correct version number: export PATH="$(brew --prefix homebrew/php/php54)/bin:$PATH"

If things are working now thats great! It doesn't always for me. I get this:

➜  ~  php -i
dyld: Library not loaded: /usr/local/lib/libpng15.15.dylib
  Referenced from: /usr/local/opt/php53/bin/php
  Reason: image not found

Sadly the only workaround I have found is to uninstall and install again: brew uninstall php53 & brew install php53

It takes quite a long time but it does the trick.


Keyboard shortcuts in PHPStorm

| Comments

Coming from Vim to PHPStorm I use the mouse a whole lot more than I did before. Vim is amazing once you learn it and the mouse can take long naps when you do everything with keyboard commands. PHPStorm is a great IDE, so I switched because I felt like I got so much more good stuff like the debugger, easy refactoring, structural overview, and so on. In the beginning I used the IdeaVim plugin in PHPStorm so editing seemed more like Vim, but I ended up abandoning that because I found it buggy.

Anyway. I slowly learned new keyboard shortcuts for PHPStorm and I wanted to share some of my favorites. Jetbrains has a a list of keyboard shortcuts you cannot miss too, but most of the ones I find to be super useful are not on that list.

It should be said that I am on a Mac using the "Mac OS X 10.5" keymap in PHPstorm.

  • command+[ and command+] to go back to the place in the code where you just were or forward respectively.
  • command+shift+delete go back to the last place in code you edited.
  • cmd+F12 bring up a quick window with all functions/classes in the current file. Type to filter and go to. I use this one all the time. I realise that I could also just use option+command+o, but this one is much faster and narrowing down is easier.

Tools

  • command+1 toggles the project pane that shows the file tree. For extra usefulness, do this one time setting: Click the gear in the menu and choose "autoscroll from source". Now the tree always shows you where you are in the file structure.
  • command+3 toggles the "find" pane. Useful for going back to see a global search done with command+shift+f. To navigate between search results use command+option+arrow-up/down
  • commmand+5 toggles the debugger pane.
  • command+7 toggles the PHP structure pane.
  • command+9 toggles the version control pane. I don't use this a whole lot---I prefer the command line for Git, but there are some nice features in the VCS tools in PHPStorm. My favorite VCS keyboard shortcut (actually this one is kind of a sequence) is ctrl+v and then hit 5 to get a Git blame panel.

In the debugger

  • option+command+r will resume.
  • command+f2 will stop (kill).
  • F8 will step.
  • shift+command+F8 will show you a list of all your breakpoints.

These are some of my favorites. Comment and share yours!


Syntax highlighting commands with Zsh

| Comments

I started using zsh about a year ago after having resisted it with a passion. My main worry was that I would "forget how to bash" and be lost on various servers I log in to. While there are some nifty things I have gotten a little too used to in zsh, I don't think it has been a big problem.

One thing that visually tells me that I am in zsh and not bash is that my zsh terminal syntax highlights as I type. Yes, you read that correctly. If you are not familiar with the zsh-syntax-highlighting prepare to have your mind blown.

When you are typing a command you get a yellow color:

ZSH syntax

Then when you have typed something that actually is a command you get green:

ZSH syntax

When you make a typo you get red:

ZSH syntax

It also makes correctly quoted strings yellow. I find that a nice help too:

ZSH syntax

On the Github project readme there are instructions for installing the plugin.


Placeholder selectors in SASS

| Comments

When I found that you can '@extend' classes in SASS to reuse code and compile to neater CSS I was pretty excited. Here is an example of 'inheriting' code with @extend:

.speak {
  font-family: Courier New, monospace;
  max-width: 400px;
  clear: both;
  span {
    font-weight: bold;
    display: block;
  }
}
.voice-1 {
  @extend .speak;
  span {
    color: magenta;
  }
}
.voice-2 {
  @extend .speak;
  float: right;
    span {
      color: green;
  }
}

That will compile to:

.speak, .voice-1, .voice-2 {
  font-family: Courier New, monospace;
  max-width: 400px;
  clear: both;
}
.speak span, .voice-1 span, .voice-2 span {
  font-weight: bold;
  display: block;
}
.voice-1 span {
  color: magenta;
}
.voice-2 {
  float: right;
}
.voice-2 span {
  color: green;
}

So voice-1 and voice-2 get the same properties as the speak class and the code is reused. All is good, but I don't really have a class called speak. And more importantly - I want to be able to define my speak selector in a base file that is included in lots of other .scss files so that it becomes truly reusable. But here I run into the problem that every time I include the _base.scss file, the selector gets written to the file including the file. That becomes a mess of repeated code really fast.

I found out about SASS placeholder selectors recently and once again my mind was blown. So a placeholder selector is a selector just like .speak, but instead of a dot (for class) it is prefixed with a percent sign. Selectors prefixed with % don't get rendered to CSS, so I don't have to worry about duplicated code or not actually having a class somewhere called speak. Now I can define the selector in a base file and extend it over and over in included files.

So:

%speak {
  font-family: Courier New, monospace;
  max-width: 400px;
  clear: both;
  span {
    font-weight: bold;
    display: block;
  }
}
.voice-1 {
  @extend %speak;
  span {
    color: magenta;
  }
}
.voice-2 {
  @extend %speak;
  float: right;
    span {
      color: green;
  }
}

Becomes:

.voice-1, .voice-2 {
  font-family: Courier New, monospace;
  max-width: 400px;
  clear: both;
}
.voice-1 span, .voice-2 span {
  font-weight: bold;
  display: block;
}
.voice-1 span {
  color: magenta;
}
.voice-2 {
  float: right;
}
.voice-2 span {
  color: green;
}

Here is a Codepen with the placeholder selectors (and some Monty Python). If you want to play around with it, take note of the "view compiled" link in the lower right corner when you are on the SCSS tab.

See the Pen SASS placeholder selectors example by Camilla Krag Jensen (@naxoc) on CodePen.


Organizing code when using Modernizr and SASS

| Comments

The JS library Modernizr makes it really easy to write CSS with support for older browsers. What it does is put classes in the <body> tag that will tell you what the browser doesn't support. For instance IE9 in the screenshot does not support CSS gradients:

Modernizr body tag classes

I was going trough with IE9 on a rather large site that uses some spiffy CSS3 tricks to achieve awesome. It has been a pleasure to work with Compass and SASS to build the site, but when it came to making it look decent in IE9 there was some work to be done.

I started to work on it, but I quickly got frustrated with the organization of the SCSS. Where should I put the IE-fallbacks? In a ie9.css style sheet? Well, that really keeps the code scattered everywhere. I wanted to keep the fallbacks as close to the original CSS3 tricks as I could so I started putting code like this as close to the "real" selector as I could:

.some-div {
  .special-list {
    .extra-special-link {
      @include background(linear-gradient(left, rgba(242, 156, 45, 0), rgba(242, 156, 45, 1) 30%, rgba(242, 156, 45, 1) 70%, rgba(242, 156, 45, 0));
    }
  }
}
// Also support archaic browsers for the extra special link (see above).
.no-cssgradients .some-div .special-list .extra-special-link {
  background: rgba(242, 156, 45, 0);
}

While this works, it becomes hard to find out what the targets are, because the whole structure needs to be prefixed with the no-cssgradients class. I would much rather have the fallbacks in the code right next to the 'actual' CSS. I did some googling for best practices for structuring the code and found this post on Neil Carpenter's blog that showed me that the '&' ampersand used behind the selector will do exactly what I wanted! This may be really trivial, but I had no idea the ampersand could be used like that in SASS. So the above code can be simplified to:

.some-div {
  .special-list {
    .extra-special-link {
      @include background(linear-gradient(left, rgba(242, 156, 45, 0), rgba(242, 156, 45, 1) 30%, rgba(242, 156, 45, 1) 70%, rgba(242, 156, 45, 0));
      .no-cssgradients & {
        background: rgba(242, 156, 45, 0);
      }
    }
  }
}

Yay! I can now keep my fallbacks together with the actual CSS and never worry about ie9.css or other tricks that separate the fallbacks from reality.


Format json output from cUrl neatly

| Comments

Here is a short simple tip to read json output from curl in a neat formatted way:

Pipe the output to Python like this:

curl "http://url.to.call?args=hi" | python -mjson.tool

This will prettify the output and make json much more readable when testing webservices. It also validates the json, so if it contains errors you will get a warning.

It works with Python 2.6 and higher and you can find more info at the Python docs page.


Color schemes and productivity

| Comments

Almost all programmers have a color scheme or theme in their terminal and their code editor. Some people actually turns syntax highlighting off, but I will never understand that. To me - code is something that lives on a black or dark background and has syntax colors. I have only ever used a white background color scheme back when I was using Eclipse 8 years ago. And probably because I couldn't figure out how to set another color scheme than the one that comes with Eclipse.

Lately I have been really bothered by reflections in my glossy screen om my MBP and my Apple Cinema Display (I know - first world problem). In the afternoon all I could really see was me - like I was looking in a mirror. While that is very enjoyable it is not the way to get work done, so I set out to find a color scheme that would make it easier to see what I am working on and not myself so much. In that process I found out that I am super sensitive to changes in my editor work setup. Change the colors a little and I have a hard time reading through code fast. It is weird and a little bit stupid that it is so, but I can't help it. It takes me about 2 weeks to get reasonably comfortable with changes to a color scheme.

This blog post is really just a listing and some screen shots of the color schemes I like. And let me tell you right now: there is no dark background color scheme that solves the glare problem - I tried tons of them and none of them are magic. Moving your chair or source of light solves some of the glare problems, but if Apple would just go back to offering a non-glare version it would be a lot easier.

The ones I like

Desert theme

I really like the "Desert" color scheme that comes with Vim as one of the default color schemes. Vim Desert colorscheme The only thing I find a little annoying is the hysterically yellow line numbers. I have put this line in my .gvimrc to tone down line numbers after the color scheme is applied:

hi LineNr guifg=grey50 guibg=grey20

That is better: Grey line numbers in desert colorscheme I haven't found a desert color scheme for PHPStorm yet. I also don't really like to use it in the terminal, so I guess the desert theme is a Vim thing for me.

Tomorrow

In both the terminal and PHPStorm I use the Tomorrow theme. It comes with support for a ton of different applications and is really well thought out. I started using this one because it has a white background version too. So much like the popular Solarized theme it can use the same colors on light and dark background. In the terminal I mainly use Tomorrow Night Eighties and in PHPStorm I switch between Tomorrow Night Eighties and just plain Tomorrow.

Here is the dark version (Tomorrow Night Eighties). Tomorrow Night Eighties in PHPStorm And here is the light version (Tomorrow). Tomorrow theme in PHPStorm

I still mostly use the dark version, but when glare becomes too much I can pretty comfortably switch to the light version and still get stuff done. It is crazy how sensitive I am to having the colors be recognizable.

Darcula

This is the color scheme that comes with the look and feel for PHPStorm called Darcula. I think it is really good looking and I can use it - but only if there is not too much light. It is a little on the low contrast side. Darcula theme

The one I don't like so much

Solarized

I realize that all code snippets on my blog use solarized. It is mainly because I haven't taken the time to change it. It really is not as simple as you would think in Octopress. Ironically - on the documentation site for Octopress solarized is not used. I haven't figured out what theme it using. Maybe it is solarized without the yellow background and just plain white.

Anyway. No reason the hate on solarized. So many people use it and love it. I just happen to think that the dark version has almost zero contrast and the yellow version makes me want to pee.


Finding unused images in your website code

| Comments

I was doing a lot of changes to CSS files today - mainly deleting a whole lot of stuff. I wanted to see if there were image files that were referenced by CSS that were no longer in use, so I wrote this naïve little script that loops through all image files it finds in the dir you give it to see if there are references to the image files.

If you have The Silver Searcher (ag) installed the script is much faster. Without Silver Searcher the script uses grep. If you don't know Silver Searcher go check it out - it is super fast.

#!/bin/bash
DIR=.
if [ -n "$1" ]
then
  DIR=$1
fi

# Find image files in.
FILES=`find $DIR -type f | grep ".*\.\(jpg\|gif\|png\|jpeg\)"`

# Default searcher is grep. If Silver Searcher is installed, use that.
SEARCHER='grep -r -l '
if command -v ag
then
  # Sweet! Let's use Silver Searcher.
  SEARCHER='ag -l '
fi

# Loop over image files.
for f in $FILES
do
  if [[ -f $f ]]
  then
    name=$(basename $f)
    found=$($SEARCHER $name $DIR)
    if [[ -z $found ]]
    then
      echo $f
    fi
  fi
done

Gist is here.

How to use the script

  1. Don't use windows.
  2. Download the gist and put it somewhere in your project.
  3. cd to the script in your command line and go chmod u+x unused-images.sh
  4. Run the script by going sh unused-images.sh or /.unused-images.sh. If you pass a directory as an argument you will search in that dir only. If you don't pass an argument the script will search in the dir it is in, so be a little bit careful with doing that in a directory that contains thousands of files.

The script outputs the images that have no references. So if you feel courageous you can delete the unused image files by piping the output to xargs and delete:

./unused-images.sh themes | xargs rm

Windows in VirtualBox on the Mac

| Comments

I have been doing more CSS and front-end stuff lately. I am having a lot of fun learning more about these things that I have somehow avoided doing for the last many years.

Today I realized that I don't have to own a MS Windows license to run a setup in a VM for browser-testing. While I don't hate Microsoft (anymore) I would really rather not buy a license for a product that I think is horrible. Anyway - I had no idea that it is super simple to set up a VM running whatever version of IE you want on Windows.

Installing the disk image was easy and I was up and running in very short time. I did however struggle a little with getting Windows to recognize the localhost (my Mac) and the vhosts I have on my local machine. I do all my development on my localhost, so I really needed Windows to understand my vhosts. Here is a writeup of what I did:

Note that I installed Win7 - the instructions for editing the hosts file might be different on other versions of Windows.

Install VirtualBox

First you need to install VirtualBox if you don't have it. Go grab an installer from the VirtualBox Downloads page and install it.

Install the Windows image

Now go to modern.ie's download page and download a virtual machine in the IE version you would like to test stuff on. For this writeup I got an IE9 on Win7. Note that instead of downloading a lot of rar-files, you can just grab a cUrl command at the bottom of the downloadboxes and paste that into your terminal.

This part takes a good while, so be patient.

Configure networking in VirtualBox

Before you start Windows, you need to configure networking in VirtualBox. So go to VirtualBox and choose 'Preferences' from the menu (or go Command-,). In the settings window - click "Network" and choose the "Host-only Networks" tab. On that tab there is a plus that you just click and accept. I didn't have to configure anything - I just got a configuration called vboxnet0. Go ahead and close preferences - this is a onetime setup thing. All images you install will be able to use these settings (if you want). Host-only Networks

Boot up Windows

Now you can double click the image in VirtualBox's main window to start up Windows. Yup - you get the Windows sound.

Find the Gateway

Once Windows has booted up we need to configure the image to talk to our localhost. Click the start button or whatever it's called and type 'cmd' in the textfield to get a "terminal". Type ipconfig at the prompt and find the part in the output where it says "Default Gateway" under the "Ethernet adapter Local Area Connection". Note that IP. It should be something like 10.0.x.x. Mine is 10.0.2.2.

Set file permissions on the hosts file

Now we need to edit Windows' hosts-file so that the vhosts we have on our Mac can be used. But first we have to change the file rights on the file. To open the Finder thingy, type explorer C:\Windows\System32\drivers\etc in at the prompt. That gives you the folder with the hosts-file. Now right click on that and select "Properties". In the window you get, click the "Security" tab and then click the "Edit button". File permissions Select the "Users" group/user and tick the "Full control" box. File rights 
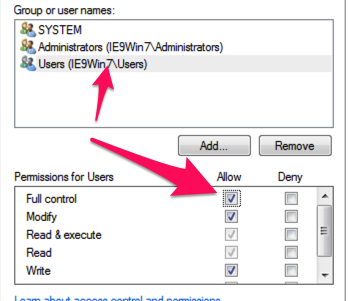
All this probably is a horrible idea securitywise, but I don't really care - I'll use this Windows install very little. Click save and you're good.

Edit the hosts file

Now we can edit the hosts file. Double click on the hosts file and choose Notepad in the "Open with dialog". Now you can add the urls that you have set up as vhosts on your Mac. Use the 10.0.x.x IP address from the ipconfig command like this for example:

10.0.2.2 d7.dev
10.0.2.2 d8.dev

Save the file and you're done! I made a desktop shortcut to the file because I feel like I'll be back for more vhost-editing soon.

Use IE!

Now you can see your Mac's webserver's pages from your VM. So open up IE(!) and go to whatever url you put in the hosts file. I just want to point out one last thing: There is a Firebug Lite to be found in (this) IE if you click the gear in the upper right corner. Firebug lite

Hope you found this very verbose walktrough helpful.